
Bioengineering Final Year Project (2023)
"The Effect of Humidity on the Glass Transition of Human Hair"
Contents and Sections:
01 Introduction and Background - initial thoughts and brief overview of the subject
02 Technique Development - full design process for the humidity chamber and stilts
03 Results - summarised with helpful context
04 Self-Review - personal reflection
Objective:
To design and construct a piece of apparatus to facilitate investigation of the behaviour of human hair in the presence of humidity.
This project involved:
-
Conceptualising an experimental set-up incorporating a range of equipment.
-
Creating a 3D scale model of a humidity chamber to translate into to a net for assembly.
-
Balancing independent research and practical work to ensure steady progress.
Skills Developed:
3D Modelling (Blender)
Product Development, Engineering and Testing
Problem Solving
Time Management
Data Collection and Evaluation
Introduction and Background
In my final year of university, I worked in collaboration with the Natural Materials Group to investigate how humidity affects different types of human hair. Prior to starting the project, hair was not a material I had ever studied, or even considered studying, before. What convinced me to choose that title was the other aspects involved: a focus on material science, a largely practical-based investigation, an opportunity to be creative and use product-design principles for problem-solving, even the possibility of incorporating anthropology (an interest of mine) into discussions of results.
What am I investigating?
An overview of the science.
'Glass transition' refers to when a material changes from a harder (glassy) state to a more flexible (rubbery) state. This can be achieved in a few ways such as by heating the material or by surrounding it in enough water.
An important feature of hair is that it is porous (has small holes) which means it can absorb water. We see this in action when hair gets wet and looks and behaves differently than when it's dry.
But, hair doesn't need to be totally saturated in water to undergo a glass transition, it just needs to be surrounded by a high enough level of humidity (water vapour in the air).
Putting that all together, I am trying to find out the humidity at which different hair types become looser and more flexible, their humidity-induced glass transitions.
Animated demonstration:
Why is this useful?
A few perspectives.
Glass transition is a property of hair that is still relatively unexplored. Much of the research for this property has been conducted on a singular hair type with the assumption that all hair is more-or-less the same. In reality, hair varies greatly in composition and structure.
From a cosmetic perspective, a better understanding of hair enables a better quality of haircare for each individual. Various cultural and social factors impact how meaningful haircare is.
Furthermore, investigations into the ways our environments determine our physical characteristics are aided by examining the properties of hair.
With this established, I acquired hair samples from four different suppliers around the world and began planning my experiments.

Technique Development

Problem: The Z0.5 Machine lacks a way to control the conditions around a sample during testing, so I needed to work out a way to steadily increase and monitor the humidity around each hair sample throughout each test.
To make this easier, I decided to conduct all tests within a humidity chamber, which I designed and built.

Zwick/Roell Z0.5 Testing Machine
(L) Z0.5 Machine set up with grips.
Before starting the project, I already knew that the most precise way to monitor and measure mechanical properties of a fibre would be to use my lab's Zwick/Roell Z0.5 Testing Machine. I developed the setup of my experiments around the features and limitations of this equipment.
Apparatus to incorporate into my design:
-
Testing Machine - top and bottom grip attachment
-
Humidity Generator - inlet for humid airflow tube
-
Humidity Meter - hole to monitor humidity throughout experiments

Humidity Meter
(R) Grip unattached.
Initial Designs
I began by outlining the criteria the final humidity chamber would need to meet:
-
Good fit with machine to avoid interference with results, but easy to remove after use for others using the machine.
-
Incorporates holes/gaps in design needed for additional equipment (humidity meter, humid air supply, grips).
-
Made out of a an appropriate material (lightweight, waterproof, sturdy, easy to work with).
-
Appropriate shape and size for samples (30mm hair fibres) and workspace.
-
Enables easy swapping of hair samples between tests.
-
Low internal volume so takes less time to reach each new humidity.
-
Allows for vision inside chamber during experiments.
I started with a simple box design, choosing 3mm acrylic Perspex sheets for my material as this could be easily laser cut into a net.
The initial design consisted of a simple cube with small holes in the top and bottom face where each sample could attach to the machine grips. Additionally, a gap was included for the supply of humid air and another for a humidity meter to rest. To swap fibres after tests, a simple hinge door was included, initially made of transparent Perspex to enable the use of a camera to capture sample behaviour.
Early designs were modelled using Blender. After carefully examining the workspace and reviewing the test procedure, these models were later revised to better satisfy the needs of the experiments.


The following changes were made:
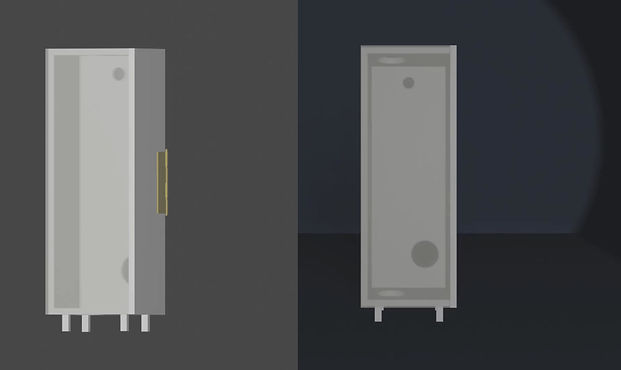
Final chamber design modelled to scale.
Area Revised | Initial Design | Final Design | Reason |
|---|---|---|---|
Location of Humid Airflow Connection | Right face, bottom. | Right face, top. | Allows humid air to fall onto hair sample. |
Location of Humidity Meter | Left face, top. | Right face, bottom left. | Humid air is denser than dry air so will fall down onto the apparatus. Moved to left to allow space for grips. |
Location of Transparent Face | Front face
(door). | Left face. | Camera already set up facing left side.
Reduced risk of smudging when changing samples. |
Dimensions (Base x Height x Depth) | 100mm x 100mm x 100mm | 30mm x 120mm x 140mm | Height increased to accommodate for grips.
Base and depth reduced so chamber fills faster. |

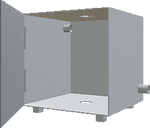
Showcase of the final Blender models.

Additionally, while working on the design for the chamber, I made a simple cardboard prototype with the dimensions 50mm x 100mm x 50mm. Though I had already taken measurements of my workspace, physically placing this prototype on the testing machine helped me to refine its size. I realised I would need more height but could afford to reduce the base and depth. This was how I reached the final dimensions 30mm x 120mm x 40mm.


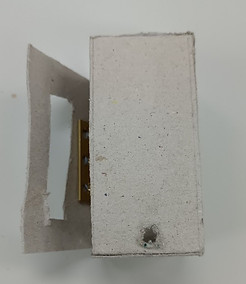

Early cardboard prototype of chamber. Holes for humid air input and humidity meter confirmed as correct. Cut-out in door to represent transparent side (later moved to different face).
Laser Cutting Perspex
Having worked with laser-cut acrylic before, I knew that I could cut out a net and assemble it into a cuboidal chamber. After researching methods for assembly, I decided to utilise tight-fitting, tab and slot joints in the design.

Diagram of tab and slot joint mechanism.
Material chosen: 3mm Perspex
Tab and slot depth: 3mm
Problem: Kerf from laser means pieces fit together too loosely.
The laser cutting process removes an amount of extra material due to the width of the laser itself, so pieces are slightly smaller than expected. A small tester net of two faces with tab and gaps at 10mm each yielded a very loose fit where the pieces easily slid past each other. Therefore, I decided to keep the gap at 10mm length, but instruct the laser cutter to cut a slightly larger tab. To find out exactly how much larger tabs would need to be, I cut a series of trial tabs into spare pieces of acrylic and tested each with the slot I had cut from my initial tester.


All tab lengths trialled against a 10.00mm gap. 10.43mm was selected as the best fit.
Trials showing loose fit (10.00mm) vs tight fit (10.43mm).
Using a 10.00:10.43 mm slot-tab ratio, I then cut a mini prototype chamber measuring 30mm x 30mm x 30mm, including the holes specified. This confirmed to me that the holes for the humid air input and the humidity meter were correct.
Final Revisions made:
A small nail holds the bottom grip in place, creating a small protrusion and preventing the chamber from sliding over it.
A the bump was measured and added to the cut-out on the bottom face.


Prototype chamber net.

Prototype chamber assembled.
Increased diameter for the top face cut-out to minimise the chance of the chamber touching the testing machine during data collection.

Diameter: 1.5mm

Diameter: 1.9mm
Nets showing final chamber design. Hover for dimension annotations.


Final Chamber


While researching the best methods for assembly, I learned that hot glue adheres well to acrylic, and is also suitable for gluing non-load-bearing metal. To attach the hinge, I marked its outline on both faces using a pen then applied hot glue directly on to the acrylic. Around where the hinge has cut-outs for nails, I added bigger lumps of hot glue to secure the hold. This method worked well and the door did not need any reinforcements.
Finally, I constructed stilts for the chamber to sit on during tests.


This process shown above involved measuring every part of the bottom grip and using the same design techniques as were used for the chamber. A small rod runs through the grip so I added a cut-out for the two faces interacting with it.
Final Test Set-Up
I measured all hair samples with a Laser Scan Micrometer before beginning my experiments to find out how much they differed structurally and to allow for links to be made between hair fibre structure and properties.

(A-C) Different perspectives of final test set-up. (D) Set-up with key features numbered:
1) Inlet for humid air supply via green tube. 2) Transparent side of chamber facing towards the camera (seen in B). 3) Grip connected to testing machine holding hair sample within a brass crimp. 4) Hinge outside chamber to allow door to close fully. 5) Stilts secured in place with white tack. 6) Humidity probe positioned with only the sensor inside the chamber (seen better in C) and handle resting level on a stand.
The video shown in the box 'What am I investigating?' demonstrates the general structure of this experiment.
Footage was recorded of every fibre tested. This video shows one of the hair samples going through its glass transition as humidity inside the chamber increased. It had been sped up as tests typically lasted 10-20 minutes.


Results
To condense a large portion of my final report as much as possible, these are my key findings. Hover over each box.
Hair Types Tested:
(5 samples from each group)
African
'African virgin hair fibres'
Source: South Africa
Highest glass transition humidities.
Lowest range in values.
Asian
'Asian virgin hair fibres'
Source: France
3rd highest glass transition humidities.
Very similar to European fibres.
European
'Caucasian virgin hair fibres'
Source: USA
2nd highest glass transition humidities.
Very similar to Asian fibres.
South American
'Latin American virgin hair fibres'
Source: Brazil
Lowest glass transition humidities.
Highest range in values.
-
The average glass transition humidity for all fibres was 65.8% RH with a standard deviation of 9.5%.
-
The fibres with the highest glass transition humidity (79% RH) were both African.
-
African samples also had the highest mean glass transition humidity (75.2% RH) and lowest spread around the mean (4.4%).
-
-
The fibre with the lowest glass transition humidity (50% RH) was South American.
-
South American samples however showed a greater standard deviation (10.4%) than the standard deviation for all fibres tested (9.5%). This suggests there is more variation within this group than between all hairs tested.
-
-
Asian and European hair samples were the most similar in their average glass transition humidities (64.4 % RH and 63.6% RH respectively).


Several points of discussion were brought up in my analysis of these results.

My data showed that all hair types are able to achieve a glass transition from humidity alone, and the values I found were in many cases lower than values cited in research. I did not have enough background information on the hairs tested to make definite links to environment and culture, so further investigation would be needed into this area.
Self-Review
The process of designing and constructing a humidity chamber gave me a chance to develop a variety of unexpected skills. It took a creative approach to problem solving, a high attention to detail and a lot of patience, but the end result was a product so ideal for its purpose that my lab requested to keep it afterwards for similar tests in the future.
The project involving a comparison between different hair types led me to explore a wide range of topics outside of anything I had studied before. I used it as an opportunity to think outside-the-box and look for any factor that might relate to a very niche project title.